Sunday, September 20, 2020

One Pan Creamy Italian Lemon Chicken Mushroom and Asparagus Skillet

There is absolutely nothing wrong with this recipe. It looks like there are a lot of steps, but they are all necessary, trust me. I didn't change a thing with it. 

Photo from SweetCDesigns
One Pan Creamy Italian Lemon Chicken Mushroom and Asparagus Skillet

Recipe from Sweetcsdesigns.com
Serves 6

  • 4 T butter, divided
  • PINCH of salt, very small amount 
  • 4 chicken thighs, bones removed 
  • 6-10 cloves garlic, sliced in half or finely diced
  • 8 oz cremini mushrooms, stems removed and wiped clean
  • 1 bunch asparagus stalks, woody ends trimmed off and discarded (optional- cut into 2-3" bits)
  • 1 c chicken stock
  • 1 c heavy whipping cream or half and half
  • 1 pinch to 1 tsp red pepper flakes, depending on your desired spicy level
  • ½ c diced cilantro, optional
  • 2 T lemon juice
  • ¼ c parmesan cheese

Heat a heavy pan on medium high until very hot. Add butter, swirl around pan, and let melt. When butter is foamy and melted, add chicken thighs.

Very lightly salt chicken thighs (ONE pinch for all things - don't overdo it!) Cook chicken thighs 5 minutes on each side, until lovely golden brown. When chicken thighs are well browned, remove from pan.

Add garlic to pan, stir well. Add mushrooms and asparagus to pan, stirring occasionally to keep mushrooms and garlic from burning.

When vegetables are browned, remove from pan and set aside. Drain excess fat from pan, but don't clean out.

Return heat to high and add stock and lemon juice to pan (watch out for steam), and scrape up any browned bits from bottom of pan.

Turn heat to medium high. Add second half of butter to pan, let melt. Turn heat off, and slowly add cream and parmesan cheese, whisking vigorously as you add it.

Return heat to medium high. Add chicken thighs back to pan, let sauce reduce another 5-8 minutes, flipping chicken occasionally, until thick and chicken thighs are 165 internal temp.

Before chicken is all the way to 165, add vegetables back into pan and mix well to ensure it is evenly coated with sauce. Top with red pepper flakes and fresh diced parsley if desired.

Remove from pan and serve immediately!

Thursday, September 17, 2020

Tator Tot Casserole a la 1970's

 Oh the 70's! What a great decade to have my childhood. The food was simple and, in some cases, odd combinations. 

One of my favorite childhood recipes was Tator Tot Casserole. Shockingly simple and so very delicious. Makes great left overs.

Tator Tot Casserole
Recipe from Mom
Serves 4 - if you have side dishes

  • 1 lb ground beef (season with salt and pepper)
  • ½ onion chopped
  • 1 can Cream of Mushroom soup
  • ½ package Tator tots

Brown ground beef and onions together. Drain. Add the can of cream of mushroom soup and mix
together thoroughly. 

Transfer to an 8X8 baking dish.

Top with tator tots, covering the beef. I line mine all up.

Bake for the amount of time your tator tots packaging say. I usually bake for about 30 minutes

Sprinkle with season salt


Tuesday, September 15, 2020

Air Fryer Tandoori Chicken

Tandoori is one of my favorite ways to cook chicken. The flavor combination hits all the happy spots for my taste buds. This recipe is simple and delicious. The air fryer adds a nice touch of crispy to the outside of the chicken. Or maybe it's just my chicken because I cook it too long. 

Air Fryer Tandoori Chicken
Recipe from Every Day Easy Airfryer Cookbook
Serves 4

  • 1 lb chicken tenders, halved crosswise
  • 1/4 c plain Greek Yogurt
  • 1 T minced fresh ginger
  • 1 T minced garlic
  • 1/4 c chopped fresh cilantro or parsley
  • 1 tsp kosher salt
  • 1/2 to 1 tsp cayenne
  • 1 tsp ground tumeric
  • 1 tsp Garam Masala
  • 1 tsp sweet smoked paprika
  • 1 T vegetable oil
  • 2 tsp fresh lemon juice
  • 2 T chopped fresh cilantro

In a large glass bowl, toss together chicken, yogurt, ginger, garlic, cilantro, salt, cayenne, turmeric, garam masala and paprika to coat. Marinate at room temp for 30 minutes.

Place chicken in single layer in air fryer basket. Spray chicken with oil. Set air fryer to 350F for 15 minutes. Halfway through, spray chicken with more oil spray and toss to gently coat. Cook for 5 minutes more. 

Transfer the chicken to serving platter. Sprinkle with lemon juice and toss to coat. Sprinkle with cilantro and serve.

Friday, September 11, 2020

Grilled Lemon Herb Mediterranean Chicken Salad

 I decided I needed at least one salad this week. So this one sounded delicious. The only problem with this recipe isn't the recipe, but the user. I neglected to make sure my lettuce wasn't wilted and gross. DOH!

The chicken marinade is delicious and so very tasty. I have used it all the time for regular chicken.

Grilled Lemon Herb Mediterranean Chicken Salad

Beautiful photo from 
Cafedelites.com


Recipe from Cafedelites.com
Serves 4

Marinade/Dressing:

2 T olive oil
juice of 1 lemon (1/4 cup fresh squeezed lemon juice)
2 T water
2 T red wine vinegar
2 T fresh chopped parsley
2 tsp dried basil
2 tsp garlic, minced
1 tsp dried oregano
1 tsp salt
cracked pepper, to taste
4 skinless, boneless chicken thigh fillets (or chicken breasts)

Salad
4 c Romaine (or Cos) lettuce leaves, washed and dried
1 large cucumber, diced
2 Roma tomatoes, diced
1 red onion, sliced
1 avocado, sliced
⅓ c pitted Kalamata olives (or black olives), sliced (optional)
Lemon wedges, to serve

Whisk together all of the marinade/dressing ingredients in a large jug. Pour out half of the marinade into a large, shallow dish. Refrigerate the remaining marinade to use as the dressing later.

Add the chicken to the marinade in the bowl; marinade chicken for 15-30 minutes (or up to two hours in the refrigerator if time allows). While waiting for the chicken, prepare all of the salad ingredients and mix in a large salad bowl.

Once chicken is ready, heat 1 tablespoon of oil in a grill pan or a grill plate over medium-high heat. Grill chicken on both sides until browned and completely cooked through.

Allow chicken to rest for 5 minutes; slice and arrange over salad. Drizzle salad with the remaining dressing. Serve with lemon wedges.

Thursday, September 10, 2020

Chicken Shawarma

 When I hear chicken shawarma I'm immediately thrown back to Saudi days when my first shawarma had cold french fries in it and a dill pickle. You'd think that would turn me off, but it didn't. 

Since those days I can't even count how many pounds of chicken shawarma I've had over the years. Some better than other. This recipe seemed like a good one to try. First, I love my air fryer and why not marry that with my love for chicken shawarma.

I chose to not make or by tziki sauce or go with a pita. I put it along side a rice pilaf and tomato salad. 

Chicken Shawarma
Recipe from Every Day Air Fryer Cookbook
Serves 4

2 tsp dried oregano
1 tsp ground cinnamon
1 tsp ground cumin
1 tsp ground coriander
1 tsp salt
1/2 tsp ground allspice
1/2 tsp cayenne pepper

1 lb chicken thighs, cut into large bite size chunks
2 T vegetable oil
Tzatziki
Pita bread

Combine the spices.

In a large bowl, toss the chicken, vegetable oil and shawarma spices to coat. Marinate at room temp for 30 min or cover and refrigerate for up to 24 hours. 

Place chicken in the air fryer basket. Set air fryer to 350F for 15 minutes or until chicken reaches 165F.

Transfer chicken to serving platter. Serve with tzatziki and pita bread.

Tuesday, September 8, 2020

Braised Cubed Steak with Peppers and Olives

Am I the only one who walks down memory lane when cube steak is in a recipe? We used to have cube steak ALL the time growing up. Mom used to use it all the time when making her famous Chicken Fried Steak. 

This recipe was super easy and super flavorful. It certainly fills you up. I used cauliflower rice and it was delicious!

Braised Cubed Steak with Peppers and Olives Recipe

Beautiful photo from SkinnyTaste


Recipe from SkinnyTaste
If you want slow cooker or instant pot versions of this recipe, go here. 
Serves: 8

8 pieces cubed steak, 28 oz
1 3/4 tsp adobo seasoning or garlic salt
black pepper, to taste
1 8 oz can tomato sauce
1 c water
1 small red bell pepper, sliced 1/4-inch thin strips
1/2 medium onion, sliced into 1/4-inch thin strips
1/3 c green pitted olives plus 2 tablespoons of brine

Season beef with adobo or garlic salt, and black pepper to taste. 

Place skillet with a lid, top with onions and peppers, pour tomato sauce and 1c water over everything and add the olives along with some of the brine (liquid from the jar).

Cook 1 hour, covered on low heat making sure there is enough liquid to cover. Add more water when it gets low.

Slow Cooker Directions: Cook 8 hours on low.

Sunday, September 6, 2020

Slow Cooker Salisbury Steak

Salisbury steak is one of my favorite comfort foods. I've made a couple of variations of it and they always have that same rich, beef/mushroom flavor to it.

The great thing about this recipe is the slow cooker element. I love turning it on and leaving it! I halved this recipe since it was just me. It was rich with flavor and the patties turned out so moist and delicious. I can't say enough good things about it.

Slow Cooker Salisbury Steak
Recipe from Spendwithpennies.com
Serves 6
6 oz sliced mushrooms
Beautiful photo from Spendwithpennies.com


1/2 onion , sliced
1 1/2 c beef broth (low sodium)
1 oz package brown gravy mix (dry)
2 T ketchup
1 tsp dijon
2 T fresh parsley
2 T corn starch
4 T water
BEEF PATTIES
1 1/2 lbs lean ground beef
1 egg yolk
1/4 c minced onion
1/3 c Panko bread crumbs
3 T milk
1 clove garlic
salt & pepper to taste
Place mushrooms & onions in the bottom of your slow cooker.

Combine beef patty ingredients and form 6 patties. Brown over medium high heat (about 3 minutes per side).

Layer beef patties over mushrooms. Combine remaining ingredients except water and cornstarch. Pour over beef and cook on low 5 hours.

Once cooked, remove patties and set aside.

Turn slow cooker onto high. Combine cold water and cornstarch. Stir into the broth and let cook a few minutes until thickened. Add beef back into the sauce to coat.

Serve over mashed potatoes or rice.

Monday, August 31, 2020

Caprese Salad with Heirloom Tomatoes & Burrata

 I can almost remember the first time I tried a Caprese Salad. It was in Italy, of course, and I believe it was like one of the first trips to Italy in high school. I fell in love immediately. 

This time of year, this type of salad is on my mind a lot. With fresh tomatoes becoming available, it's a go to salad for me. 

This one I switched up a little. I'm not a fan of arugula so I used spinach instead. Really good swap in my opinion. 

Caprese Salad with Heirloom Tomatoes & Burrata

Photo from EatingWell


Recipe from EatingWell.com
Serves 6

2 T extra-virgin olive oil
1 T balsamic vinegar
¼ tsp salt
¼ tsp ground pepper
2 c baby arugula
4 c sliced heirloom tomatoes
4 ounces burrata, sliced
½ c basil chiffonade (see Tip)
¼ tsp flaky sea salt

Whisk oil, vinegar, salt and pepper in a small bowl. Toss arugula with 1 tablespoon of the vinaigrette in a small bowl.

Place the dressed arugula on a platter. Decoratively arrange sliced tomatoes and burrata over the arugula. Sprinkle with basil and flaky salt.

Starbucks Copycat Banana Nut Bread

 Starbucks banana bread is the bomb to me. In a pinch when I don't have fresh banana bread - which is most of the time - Starbuck's bread does just fine. 

I stumbled onto this recipe and thought I'd give it a try. 

I didn't have any nuts, so it's nut free. And I gotta say...it's delicious and very good!

Starbucks Copycat Banana Nut Bread
Recipe from Butteryourbiscuit.com

2 c flour
1 tsp baking soda
1/4 tsp salt
1/2 tsp cinnamon
1 egg
1 1/8 c sugar
1/2 c vegetable oil
2 T buttermilk
1 tsp vanilla
3 extra ripe bananas
1/2 c chopped walnuts

Preheat oven to 325 degrees, spray a 8x5 loaf pan with non stick spray and line it with parchment paper if desired.

In a medium bowl add flour, baking soda, salt and cinnamon and whisk just until combined.

In another medium bowl add egg, sugar and oil and whisk until combined.

Add the dry ingredients to the wet ingredients and mix well, the mixture will be thick and dry.

Add in the buttermilk, vanilla and smashed bananas and mix until combined.

Pour into a loaf pan, sprinkle walnuts over the top.

Bake on the center oven rack for 60-75 minutes or until knife comes out clean.

Sunday, August 30, 2020

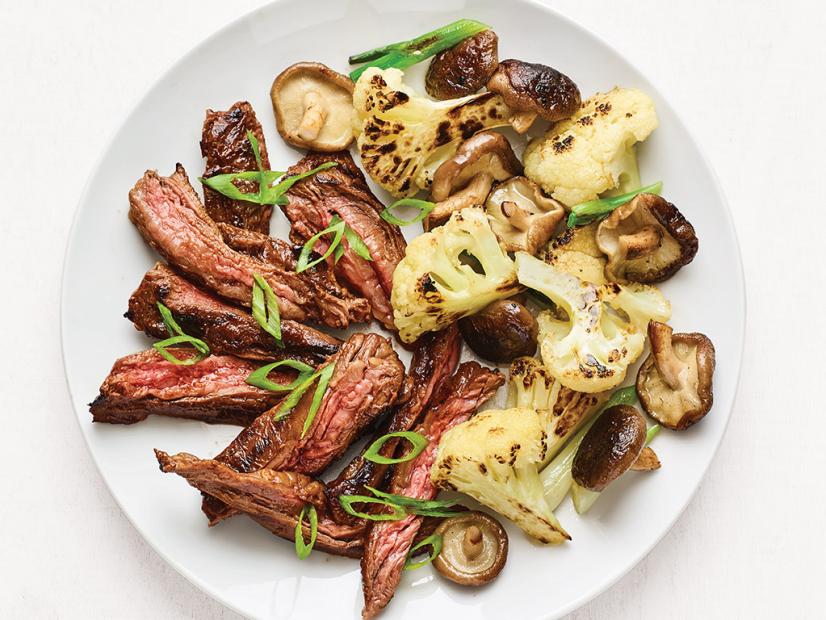
Hoisin Skirt Steak with Cauliflower

The hoisin glaze for the steak is delicious. It was super flavorful with a little spicy finish! 

I didn't follow the recipe for the cauliflower. Well, not completely. I cut the cauliflower into steaks (meaning cutting an inch  thick slice). I put olive oil on them and salt and pepper and put them on the grill.  

Hoisin Skirt Steak with Cauliflower
Recipe from Food Network

Photo from FoodNetwork

Serves 4

1/4 c hoisin sauce
2 T ketchup
1 T rice vinegar
2 tsp finely grated fresh ginger
2 tsp honey
2 tsp sambal oelek or other chili-garlic sauce
1 1/4 pounds skirt steak, cut into 4 pieces
Kosher salt and freshly ground pepper
1 small head cauliflower (about 1 1/2 pounds), trimmed and cut into small florets
8 ounces shiitake mushrooms, trimmed, caps halved
2 T plus 1 teaspoon vegetable oil, plus more for the grill
1 bunch scallions (1 thinly sliced, the rest cut into 1 1/2-inch pieces)

Preheat a grill to medium high. Combine the hoisin sauce, ketchup, vinegar, ginger, honey and sambal oelek in a small bowl. Season the steak with salt and pepper. Brush about half of the hoisin sauce mixture all over the steak.

Put the cauliflower and 1 tablespoon water in a large microwave-safe bowl, cover and microwave until the cauliflower is crisp-tender, 5 minutes. Blot dry. Toss the cauliflower and mushrooms with the vegetable oil and 3/4 teaspoon salt; spread out in a grill basket.

Oil the grill grates. Grill the steaks until well marked, 3 to 4 minutes per side for medium rare, brushing with the remaining hoisin sauce mixture during the last minute of cooking. Transfer to a cutting board to rest. Meanwhile, grill the vegetables, tossing occasionally, until browned around the edges and crisp-tender, about 8 minutes, adding the larger scallion pieces to the grill basket during the last 2 minutes of cooking.

Divide the vegetables among plates. Slice the steaks, add to the plates and sprinkle with the thinly sliced scallions.

Saturday, August 29, 2020

Boozy Chocolate Poke Cake

Janet is turning 60 on Sept 3rd. We had a surprise party for her on the Saturday before! And every good party needs a good cake! So I made this Boozy Cake for Janet. 

It's involved and you do need to plan a little (like get your ice cream out to melt).

This cake was RIGHTEOUS! So good. I highly recommend making this for anyone you love...or you could make it for someone you hate and NOT give it to them. 

The other benefit is you have left over Guinness. I mean you have to buy a 6 pack and you only use like a cup...

Boozy Chocolate Poke Cake
Recipe from BuzzFeed
Serves 15

Photo from thefeed.com

2 c all-purpose flour
3/4 c dark cocoa powder
1 tsp baking powder
1 tsp kosher salt
3/4 c unsalted butter, room temperature
1 & 1/2 c granulated sugar
1/2  packed brown sugar
1  sour cream, divided
2 tsp vanilla extract
3 large eggs
1 c Guinness Draught Stout
1/4 c Baileys Irish Cream
1 & 1/4 c melted vanilla ice cream
2 c heavy whipping cream
1 c semi-sweet chocolate chips
1 T coconut oil

Preheat oven to 350F. Coat a 9x13-inch baking dish with nonstick spray.

Whisk together flour, dark cocoa powder, baking powder, and kosher salt in a medium bowl. Set aside.

Combine butter and both sugars in a large bowl. Using a hand mixer, beat on high for 2–3 minutes. Beat in 3/4 cup sour cream and vanilla extract. Beat in eggs.

Mix in half of the flour mixture. Mix in Guinness Draught Stout. Mix in the rest of the flour.

Pour cake batter into prepared baking dish. Bake for 30–35 minutes or until a toothpick inserted into the middle comes out clean or with only a few crumbs attached.

Remove from oven and let cake cool. Using the handle of a wooden spoon, poke holes all over the cake.

Whisk together Baileys Irish Cream and melted vanilla ice cream. Pour mixture over cake, being sure to fill the holes. Use a silicone spatula to spread liquid evenly.

Combine heavy whipping cream and 1/4 cup sour cream in a bowl. Using a hand mixer, beat on high until soft peaks form. Spread whipped cream evenly over cake.

Refrigerate for 3 hours.

Combine chocolate chips and coconut oil in a small bowl. Microwave in 30-second increments, stirring in between, until smooth. Drizzle cake with melted chocolate.

Slice and serve!

Thursday, August 27, 2020

Hot Cheesy Cuban Rollups

Part of my 100 New Recipe goal this year is that I'm purposely cooking things like cookies, treats, and appetizers. They're recipes in my list and I can't "wait" to try them when I have company...within reason anyhow. 

This recipe is clearly an appetizer type recipe. My plan was to cook it and have a salad with it. I ended up just having the salad. 

The problem I always have with these types of recipes is that the inside dough RARELY gets cooked and I hate sticky, guncky dough. The outside dough was brown and almost well-done, and the inside was barely cooked. I also COMPLETELY missed the step to cut the roll up first then back. I totally baked the entire roll up and I think that is where I went wrong. 

Ok...I change my mind. I'm going to keep this one and try it again later and correctly. 

Hot Cheesy Cuban Rollups

Recipe from Tasteandsee.com
Serves 12

2 store-bought puff pastry sheets
10 ounces diced pickles (Buy one 20-ounce jar of Claussen sandwich slices - after draining the liquid this will yield the quantity you need)
1/2 c yellow mustard
1 tsp garlic powder
1 tsp onion powder
1 pound thin-to-medium sliced deli ham (this should be more than enough to cover the two puff pastries)
9 ounces sliced Swiss cheese (about 18 slices - I used 9 slices for each puff pastry)
1 egg
1 T water

Thaw out two puff pastry sheets. Roll each one out just a bit onto two large pieces of plastic wrap. (10 1/2 x 10 1/2 inches)

Mix garlic powder, onion powder and mustard together in a small bowl. Spread this evenly across both puff pastry sheets, leaving a ¼-inch border all around the outside edges of the dough. Sprinkle 5 ounces (half) of the diced pickles on each pastry sheet, then layer on the cheese and the ham.

Roll up the dough, making sure that the ham and cheese don’t slide out while you’re rolling. Wrap the plastic wrap tightly around the roll ups, place on a baking sheet seam-side down, and chill in the fridge for 30 minutes.

Preheat your oven to 375F and set racks to the upper and lower thirds. Remove the plastic wrap from the roll up, and place it on a cutting board. Using a serrated knife, gently cut (using a saw like motion) it into ¾-inch slices. You should have about 12 slices per roll up – 24 total.

Now lay each rollup on its side, on two baking sheets lined with parchment paper, spacing them an inch or two apart. You may need to reshape them a little to round them out. In a small bowl whisk the egg with 1 tablespoon of water, then brush this egg wash on top of each pinwheel. Bake for 24-26 minutes total, rotating the baking sheets midway through.

Tuesday, August 25, 2020

Sour Cream Chocolate Chip Muffins

As part of my goal to cook 100 recipes this year, I decided whatever came up in the random selection I'd make. To be fair there have been a couple "sweet" treats I've skipped because it seems pointless to make them and not be able to take them to work (like peanut butter truffle filled cupcakes for example. No way I'm making them for home. 

So these came up and I thought they'd be good for a breakfast or two. I froze 10 of them and kept 2 hour for breakfast this week.

These are light and delicious. I wouldn't use as many chocolate chips next time I make them. 

Sour Cream Chocolate Chip Muffins
Butteryourbiscuit.com

Photo from Butter Your Biscuit

Makes 12

2 1/2 c all-purpose flour
2 tsp baking powder
1 tsp baking soda
1/4 tsp salt
1 c granulated sugar
1/2 c butter melted and cooled
2 tsp vanilla
2 large eggs
1/2 c sour cream
1/2 c buttermilk
1 1/4 c mini chocolate chips, plus more for topping

Preheat oven to 425 degrees

In a medium bowl whisk together flour, baking powder, soda and salt, set aside.

In another bowl whisk together sugar, butter, vanilla, eggs, sour cream and buttermilk until combined.

Add in the dry mixture and mix until combined. Then fold in chocolate chips.

Fill your muffin tins to the very top, sprinkle a few chocolate chips on top and a pinch of coarse sugar if desired.

Bake at 425 degrees for 5 minutes, then reduce heat to 375 degrees and bake another 10-12 minutes. Or until toothpick comes out clean.

Remove muffins from oven and let cool, store in an airtight container for 3 days

Monday, August 24, 2020

Carbonnade à La Flamande

 I've had this recipe in my hot little hands since 2005. I think that's the longest I've had anything. 

What is Carbonnade à La Flamande? It's a classic Belgian beef stew. According to Food and Wine, "This classic Belgian beef stew is known for its sweet-sour combination of caramelized onions and beer."

It definitely had the sweet and sour thing going on - which threw me off a bit. I didn't expect to taste any brown sugar considering the recipe is only for 2 T. And yet, I could totally taste it. 

Bottom line? Not my favorite. It's good, but not great. If I were in Belgian I'd totally order it to try it by a professional. I won't likely make it again though since I have so many recipes to try. But it's definitely worth the first try.

Carbonnade à La Flamande
Recipe from MyRecipes

Photo from MyRecipes

Serves: 8

3/4 c flour (about 3 1/3 ounces)
1/2 tsp salt
1/2 tsp black pepper
1/8 tsp ground nutmeg
2 1/2 pounds boneless chuck roast, trimmed and cut into 1 1/2-inch cubes
2 strips bacon, diced (uncooked)
2 c chopped onion (about 2 large onions)
1 T chopped garlic
1 (14-ounce) can less-sodium beef broth
1 c  water
2 T brown sugar
2 T red wine vinegar
2 T tomato paste
2 T Dijon mustard
1 tsp fresh thyme
2 bay leaves
1 (12-ounce) bottle dark beer
2 T chopped fresh parsley

Combine first 5 ingredients in a large zip-top plastic bag. Seal; shake to coat.

Heat a large Dutch oven over medium-high heat. Add bacon to pan; cook 1 minute. Add beef mixture; cook 3 minutes or until browned. Remove beef from pan.

Add onion and garlic to pan; sauté 5 minutes or until tender.

Return beef to pan. Stir in broth, scraping pan to loosen browned bits. Add water and the next 7 ingredients (through beer); bring to boil. Cover, reduce heat, and simmer 30 minutes. Uncover and cook 30 minutes or until beef is tender. Discard bay leaves. Garnish with parsley.

Saturday, August 22, 2020

Grilled Cilantro Lime Chicken

 Lime, cilantro and chicken are great together. I like a good, simple marinade and this is just that. If you've cooked for awhile, then this is pretty common sounding marinade. 

I cubed my chicken - more marinade flavor per square bite is my motto. Otherwise, this recipe stood on it's own and I made no modifications to it. 

Grilled Cilantro Lime Chicken
Recipe from Simplyrecipes.com

Photo from Simply Recipes
Serves 4

2 pounds skinless, boneless chicken breasts
2 T extra virgin olive oil for the marinade, plus more for grilling
Grated zest from 2 limes
Juice from 2 limes (about 1/4 cup)
3 T chopped cilantro
1/2 tsp sugar
1/2 tsp salt
1/4 tsp black pepper
Lime wedges, fresh sprigs of cilantro, and slices of avocado, to serve

Pound chicken breasts to even thickness: Place the chicken breasts between two piece of plastic wrap or wax paper and pound to an even thickness with a meat mallet or rolling pin.

Marinate the chicken: Mix the olive oil, lime zest, lime juice, cilantro, sugar, salt, and pepper together in a large bowl. Add the chicken and massage the marinade into the chicken. Cover and chill for at least 30 minutes, and up to 4 hours or overnight.

Preheat Grill: Preheat a gas or charcoal grill for medium-high heat grilling, or until you can hold your hand about an inch over the grates for 1 second.

Grill the chicken: Remove the chicken breasts from the refrigerator. Remove them from the marinade and pat them dry with paper towels. Coat the chicken breasts with some olive oil.

When the grill is hot, place the chicken breasts on the grill. Grill for a few minutes on each side, until just cooked through.

Friday, August 21, 2020

Parmesan Chicken and Rice Casserole

 RECIPE FAIL!!! Big time. 

The recipe sounds delicious. But I cheated and took shortcuts when I knew I shouldn't. 

The first is I cut the receipt in half...not a fail for sure, but I sometimes think cutting recipes in half they just don't turn out as good. 

The second is I dislike rice in a bag, or minute rice. I had a couple of cups of minute rice (brown and white) so decided to use that instead of the rice in a bag. Usually when rice in a bag, or minute rice is called for I just make rice. It's not that hard. 

But I caved. I wanted to use the things I had in my pantry. Blech. One of the cups of white rice smelled funny. Like vinegar-y. So I tossed it. One cup of the brown rice also smelled funny. So I got one cup of white and one cup of brown. Bad combo. 

I may try this again, but unlikely. I have so many recipes to try that unless it's FANTASTIC its not likely I'll make it again. 

Parmesan Chicken and Rice Casserole
Recipe from My Recipes

Thursday, August 20, 2020

Lemon Grilled Chicken Breasts

 Lemon and chicken go together like ... well peanut butter/jelly, wine/cheese, Abbott/Costello, and so on. And lemon happens to be one of my favorite flavors. 

Nothing fancy about this recipe. Super easy, and definitely filled with flavor. I used 3 cloves of garlic, because, well...I'm a Wraspir and that's what you do. 

Lemon Grilled Chicken Breasts
Recipe from Myrecipes.com
Serves 4

3 T fresh lemon juice

Photo from MyRecipes

2 T extra virgin olive oil
2 garlic cloves, minced
1 lb skinless, boneless chicken breast halves
1/2 tsp kosher salt
1/2 tsp freshly ground black pepper
Cooking spray

Prepare grill to medium-high heat.

Combine first 4 ingredients in a large zip-top plastic bag; seal. Marinate in refrigerator 30 minutes, turning occasionally. Remove chicken from bag; discard marinade. Sprinkle chicken evenly with salt and pepper.

Place chicken on grill rack coated with cooking spray; grill 6 minutes on each side or until done.

Wednesday, August 19, 2020

Mexican Pizza

 I've not ever had Mexican pizza in this sense. The author of this blog likens this to the Mexican Pizza from Taco Bell. I've definitely not had that, so I can't compare. 

This recipe has a bit of prep before you can put everything together. So you will need to plan so you have all your components cooked so you can put the pizza together. 

Overall it was tasty, but I think I'd stick to just tostadas - they're just simpler. This was a bit of a mess to eat.

Also I couldn't find taco sauce, so I used enchilada sauce. And I added a half of can of green chilis in with the meat because I had some left over. 

Mexican Pizza
Recipe from Butteryourbiscuit.com

Photo from ButterYourBiscuit

Serves 4

1 pound ground beef
1 packet taco seasoning
1/4 c water
8 (6-inch) flour tortillas low carb
1 (16 ounce) can refried beans
2 (8 oz) jars taco sauce
1 1/2 c shredded cheddar cheese
1 1/2 c shredded pepper-jack cheese
1 large diced tomatoes
1 can sliced olives
1/2 c vegetable oil
green onions sliced

Preheat oven to 400 degrees F.

In a large skillet heat the oil up on medium heat.

Fry each tortilla in the oil just until lightly browned and crispy, remove and set aside on paper towels

Meanwhile, cook the ground beef in a large skillet over medium-high heat. Drain grease. Add taco seasoning, water and simmer then add 1/2 cup taco sauce. Bring mixture to a boil, then reduce heat to medium-low. Stir and simmer for 10 minutes. Remove from heat.

In a small pan on medium heat warm the refried beans

Place a single layer of the beans on the crispy tortillas, followed by a layer of the taco meat, Top with another tortilla. Spread 3-4 tablespoons of taco sauce, sprinkle some cheddar and jack cheese and top with a few tomatoes and olives.

Bakes in the oven for 10-12 minutes or until cheese is melted and bubbly

Remove from oven let set for 5 minutes top with green onions and slice

Thursday, August 13, 2020

Judy Hubbell's Baked Halibut

 Mrs. Hubbell is a family friend that had been in our lives forever. We lost her several years ago but her legacy in her food lives on. I have a couple of recipes from her, but this is my favorite. 

I'm a fan of halibut. It's expensive and I've been known to bake the crap out of it causing halibut jerky...but not tonight. Tonight I remembered to put the timer on!

Super easy. Super delicious recipe. But I made it better.

First, I added Parmesan and parsley to the panko. Oh and I used panko instead of bread crumbs. And lastly, I cooked it in the air fryer. 

Judy Hubbell's Baked Halibut
Recipe from Mrs. Hubbell!

Photo from the internet

Serves as many as you want

1 c butter
1 c bread crumbs ( I used Panko)
Johnny's Seafood Seasoning
Juice of one lemon
Salt and Pepper to taste

Melt butter, add lemon juice. 

Combine bread crumbs, salt, pepper and seafood seasoning. [JW: I added grated paremsan and parsley]

Dip halibut in butter mix, then dredge in bread crumbs.

Spray cookie sheet with cooking spray. Bake halibut at 400F until done.

Wednesday, August 12, 2020

Low Carb Pepperoni Pizza

Pizza is a fave of mine. Anyone who doesn't like pizza, in my opinion, has something not right in their noggin. But, trying to be low carb pizza isn't a great option. Enter Low Carb Pizza dough. 

There are a million and one recipes on the internet for FatHead Pizza dough. This recipe is just like all those really. The one main difference is the psyllium husk. Turned out I had run out of psyllium husk and so I didn't use it. The dough was just fine. 

This dough has tricked me in the past. Not mixing it well enough and the almond flour clumping and so on and so on. But this time I got smart. 

Researching and watching videos, I used fresh mozzarella. You know? Like in the ball, not the shredded kind in a bag. Those kinds have fillers to them that keep them fresh and so melting that is troublesome. 

The next thing I did was put the almond flour in with the cheese as I melted it. I mixed it all together so the almond flour was evenly distributed.

I took my time and mixed this really well. It's a wet dough and rolling it between two pieces of parchment paper with olive oil on them worked great. I also recommend cooking this ONE parchment. So much cheese means this may stick.

If you are expecting the taste and texture of pizza dough, you will be disappointed. If you're looking for a reasonable replacement for pizza while on low carb, this will work for you. 


Low Carb Pepperoni Pizza
Recipe from Ruled.me
Serves 2

Pizza Base
2 c (~8 oz.) mozzarella cheese
¾ c almond flour
1 T psyllium husk powder
3 T (~1.5 oz.) cream cheese
1 large egg
1 T Italian seasoning
½ tsp salt
½ tsp pepper

Toppings

1 c (~4 oz.) mozzarella cheese
½ c Rao’s tomato sauce
16 slices pepperoni

Optional: sprinkled oregano

Microwave mozzarella cheese until completely melted, then add all other base ingredients (except olive oil) and mix together.

Knead dough into a ball, then spread out into a circle using the olive oil on the outside of the dough.

Bake crust for 10 minutes under 400F. Remove from oven, flip, and bake for 2-4 more minutes.

Top the crust with toppings of your choice and bake for another 3-5 minutes.

Let cool slightly, slice, and serve!